Browsing Tag

Village Edges

Elizabeth Craft Designs General Joset Designs Uncategorized

Christmas In July Card

July 5, 2022

Hi everyone, it’s Tina here. It’s Christmas In July and I wanted to share a Snow Globe Shaker Card using the Snow Globe and Village Edges Dies. Below you will find the steps to create your own card.

Step 1 – Trim White Soft Finish Cardstock to 8” x 6”, score at 4” and fold in half for a vertical side fold card. (in between an A2 and Mini Slimline card)

Step 2 – Trim White Soft Finish Cardstock to 3 3/8” x 4 6/8”. Apply Ink of your choice using 3 tones of Purple Blue using a Blender Brush. I used water reactive inks so I could splash some water to create some texture to my background. For added interest splash some White Gouache mixed with a little water. Let Dry.

Step 3 – Diecut Snow Globe using White Soft Cardstock. Place it on the background created in Step 3 to cut out the domed shape on top. I marked it with a pencil using the outer edge and trimmed off about 1mm inside the pencil line. Adhere to the background to the card front using 3mm Clear Double Sided Adhesive Tape. Put the Snow Globe frame aside from now.

Step 4 – Diecut Village Edges using White Soft Finish Cardstock. Trim to 3 3/8” length and adhere to the bottom of the background using Kid’s Choice Glue. I diecut 2 layers. I kept the diecut windows and doors intact. Optional – diecut the Trees in colors of your choice. I used Teal Cardstock.

Step 5 – Adhere Acetate Sheet on the bottom side of the Snow Globe frame using Glue of your choice. Let dry. Add thin Foam Tape to the backside frame. Trim the edges overhanging. Add Sequins of your choice to the top of the card front to the center. I used Purple Sequins and Silver Stars. Remove the release sheet from the Foam Tape and carefully secure it to the card front.

Step 6 – Diecut Snow Globe (bottom) 3 times. Stamp Holiday Sparkle sentiment using Versafine Onyx Black Ink to the center. Attach each layer leaving the sentiment on top and adhere to the underneath of the Snow Globe using Foam Tape.

There is no such thing as making Holiday cards too early. We are already in July. Below is a link to all the products used. Thank you for stopping by and Happy Crafting!

Products Used:

Planner Essentials

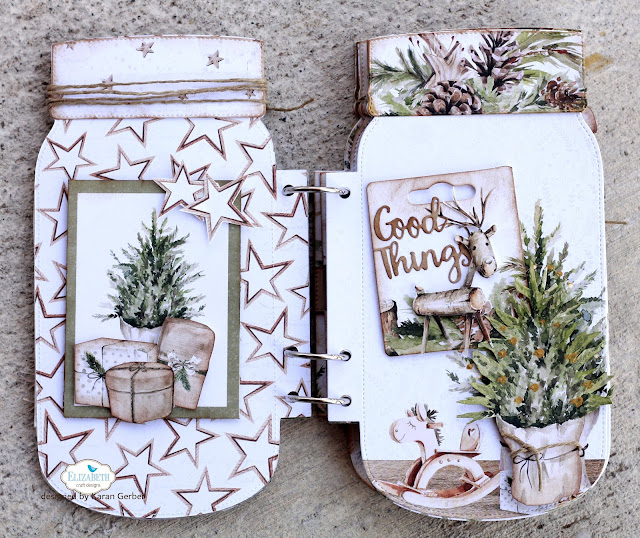
Hello Winter – Mason Jar Album

January 17, 2022

Hello friends and thank you for dropping by. It is Karan back to share another project with you and today I am sharing a mini album I designed using the Mason Jar Kit. To beging with this mini album has 6 pages in it, each page is cut twice (except for the cover which I cut three times to include the acetate).

I created a shaker on the cover. I die cut the front piece twice on pattern paper and once out on acetate, adhering the acetate to the front pattern piece cover. To create the shaker part of the cover I used foam adhesive and created strips all along that to allow me the depth I needed to add my shaker bits.

Adding some art stones, prills (to coordinate with the paper) and some sequins along with a bit of glitter that created the shaker. I also die cut and stamped the sentiment on the mini mason jar for my title. I tied that to the twine I had wrapped around the jar lid.

I die cut the trees from the Mason Jar Kit and thought the Village Edges would add a great detail to the cover. 
For the inside, here are the pages i created, this is designed using the Cozy Winter Collection from P13

I cut each page out twice so they would be thick, using the dies from Planner Essentials 30. I cut out tags and used those as photo mats throughout. 
I used some of the journal tags in the collection as photo mats as well, and fussy cut some details out to further embellish my mini mason jar album. 

I made sure to cut jar toppers for each page to add more detail.

This page has some tags from the collection that I fussy cut. I used the Stitched circle die to die cut the circle globe

tag on the right side of the page. I die cut the mini mason jar and used it as an element on this page too.

These pages have some photo mats tucked in the mason jar belly band. I used the circle label stamps here. 


I hope you give the Mason Jar Kit a try, it makes a gorgeous album. 

Karan

Elizabeth Craft Designs Supplies:

Elizabeth Craft Designs General Joset Designs

Joyful Wishes Mini Slimline Card

November 21, 2021

Hi everyone, it’s Tina here. I had my Jack Frost dies out and I wanted to create a female snowman so I took out my inks and some older Elizabeth Craft Design Products and love how it all came together. Below you will find the steps to create your own card.

Step 1 – Trim White Soft Finish Cardstock to 7” x 6”, score at 3 1’2” and fold in half for a vertical side fold card. (Mini Slimline)

Step 2 – Trim White Soft Finish Cardstock to 3 1/4” x 5 3/4”. Apply any inks of your choice using a Blender Brush. I wanted a rainbow sky. I used a pink, orange, yellow, green and blue ink. I splashed some water. You can see I had an accident as a big blob of water spilled on my background. I decided it was a happy accident and went with it. Let dry then adhere to card using 3mm Clear Double Sided Adhesive Tape.

Step 3 – Diecut Village Edges using White Soft Finish Cardstock. Adhere to card using 3mm Clear Double Sided Adhesive Tape to the snowbank only.

Step 4 – Diecut Jack Frost and Winter Accessories in various colors of cardstock, use the same color inks on White Soft Finish Cardstock. Assemble and adhere to card using Kids Choice Glue.

Step 5 – Stamp Holiday Sparkle sentiment using the same pink ink used in the background.

Step 6 – Diecut Diagonal Fishtail using the sentiment from step 5. Adhere to card using 3mm Clear Double Sided Adhesive.

This is a fun card to put together. You can change it up by changing it to a male snowman and/or changing the colors. Below is a link to all the products used. Thank you for stopping by and Happy Crafting!

Products Used:

Inspiration from the Design Team Paper Flowers Planner Essentials Silk Microfine Glitter Soft Finish Cardstock

Merry & Bright Mini Album

November 10, 2021

Hello Friends and welcome to the Elizabeth Craft Designs Blog. It is Karan Gerber here sharing a project with you. Today I have a mini album to share with you. I designed this using the Florals 12 on the cover along with the Indented Stitched Rectangles and Stitched Fishtails. The inside boosts a few more of my favorites and I hope you enjoy. 

The papers are from Stamperia – Classic Christmas. I love the vintage feel to the images in this collection and they were perfect for photo flips throughout the album. 

Inside cover and first page. I free hand drew the curves pockets on the inside front cover and used the Indented Rectangles as photo mats throughout the album.

Page 2 and 3 – Indented Rectangles used again for photo flips. 

Above I used Planner Essentials 16 and created a pocket from that large tree. Photo mats will fit in there. Same with the Small Villages on page 5. Photo mats will slip in under the houses and trees on that page. 

For pages 6 and 7 I used the Stitched Indented Rectangles for the front of a side pocket. 

For he last page and inside back cover I used the Stitched Circles and Indented Rectangles. Lots of gold mirri paper was used throughout. 

I am attaching some detail photos of the cover for you. I hope you have enjoyed my project share for you today. 

Elizabeth Craft Designs supplies:


Elizabeth Craft Designs General Joset Designs Sue Smith Creative Designs

Winter Wishes Slimline Card

October 15, 2020

Hi everyone, it’s Tina here. Slimline cards are the rage right now and I will show you that dies originally made for A2 sized cards can be used on Slimline cards. I am using the Village Edges die as an example. Below you will find the steps to created your own Winter Wishes Slimline Card.

Step 1 – Trim White Soft Finish Cardstock to 7″ x 8 1/2″, score at 3 1/2″ and fold in half for a vertical side fold card. (Slimline)

Step 2 – Trim White Soft Finish Cardstock to 3 1/4″ x 8 1/4″. Apply Distress Oxide Ink using a Foam Applicator starting a little bit past the half way with the lightest shade, then working up to darkest. Tumbled Glass, Faded Jeans, Chipped Sapphire, Black Soot.

Step 3 – Diecut Village Edges 2 times for each die. One diecutting from the left and the second one from the right. Loosely layer first on the background created in Step 2 to see where the top one will be positioned. Adhere 1st layer (top) using 3mm Clear Double Sided Adhesive Tape, 2nd layer using Foam Tape, 3rd layer using 3mm Clear Double Sided Adhesive and last (bottom) layer using Foam Tape.

Step 4 – Stamp Snow sentiment using Versamark to the panel created in Step 2. Sprinkle Gold Embossing Powder and remove the excess. Heat set it with a Heat Tool.

Step 5 – Optional – Apply Perfect Pearls in Gold onto an Acrylic Block, add a spritz of water, mix with a #2 paintbrush and tap the waterbrush onto the panel to create Gold Droplets. Keep repeating until you cover the panel. Let dry (it doesn’t take too long to dry). Adhere the panel to the card front using 3mm Clear Double Sided Adhesive.

This card can be used for several occasions by changing the colors and/or sentiment. For example color in the houses and change the sentiment to Congratulations on your new Home. Below is a link to all the products used. Thank you for stopping by and Happy Crafting!

Products Used:

Cardmaking Elizabeth Craft Designs General Joset Designs Soft Finish Cardstock

Sunset Scene Card

January 8, 2020

Hi Everyone, it’s Tina here. Before I start I want to wish you all a Happy New Year. All the best for a healthy, prosperous and crafty year ahead.

One of my favourite dies last year was the Village Edges. I showcased it to create a Holiday Scene, but today I want to show you how versatile it is for any occasion. Below are the steps to create your own Sunset Scene card.

Step 1 – Trim White Soft Finish Cardstock to 8 1/2” x 5 1/2”, score at 4 1/4” and fold in half for a horizontal side fold card. (A2)

Step 2 – Trim White Soft Finish Cardstock to 5 1/2” x 4 1/4”. Apply Distress Oxide Inks using a foam applicator. Starting from the bottom working upwards apply Wild Honey, Ripe Persimmon, Fired Brick and Dusty Concord. Adhere to card using 3mm Clear Double Sided Adhesive Tape.

Step 3 – Diecut Village Edges using Black Cardstock. Adhere the bottom layer using 3mm Clear Double Sided Adhesive leaving a 1/4” border. Do not adhere the top layer yet.

Step 4 – Diecut Words 2 – Thinking Of You 3 times using White Soft Finish Cardstock. Adhere Kids Choice Glue and stack up the Diecuts. Apply Distress Oxide Ripe Persimmon Completely over the top layer, apply Fired Brick just to the top edge. Sprinkle Clear Embossing Powder and heat set it with a Heat Tool. Repeat this 2 more times but ink with Versamark. Adhere the sentiment using Kids Choice Glue to top layer of the Village Edges.

Step 5 – Here I did some stamp surgery to get the exact Sentiment. Stamp Safari Saying “Have A” using Versamark. In another sentiment I stamped just the “N”. Next stamp “Birthday” again using Versamark. Sprinkle White Embossing Powder and heat set it with a Heat Tool. Adhere the top layer Village Edges to the card using Foam Tape.

I hope you enjoyed seeing the Village Edges used in another occasion. Below is a link to all the products used. Thank you for stopping by and have a wonderful day.

Tina

Cardmaking Elizabeth Craft Designs General Els van de Burgt Studio Joset Designs Soft Finish Cardstock Stamping

Clean And Simple Christmas Shaker Cards

November 24, 2019

Hello everybody, it’s Sanna Lippert here again today with another guest design team project. For today’s post I have prepared a set of clean and simple style Christmas shaker cards with a photo step-by-step tutorial. I wanted to create simple looking, yet sparkly cards and this is what I ended up creating.

Here is how I created the cards:

Take a sheet of white Soft Finish Cardstock and cut it into two card base sizes you have prepared for cardmaking. Then place the white cardstock pieces into your die cutting machine and die cut a Fitted Star and a Fitted Circle with it. Place the die cut centered, but onto the upper part of the cardstock piece. Then die cut.

Next die cut from the residue sheet of white Soft Finished Cardstock some rows of houses using the Village Edges die cut die set. The images don´t have to be perfect all the way to the end, because you will only be using parts of them.

Now grab some Distress Oxides of your choice (I used Peacock Feathers and Fossilized Amber) and apply the oxide with an ink blending tool with circular motion onto the white card base background approximately to the area where the star and the circle will be. This way you create a coloured background to that area.

Then stamp a sentiment with black ink under the star and the circle areas. I used the Winter Sentiments clear stamp set here, but you can pick a sentiment set of your choice.

Now arrange the rows of houses under the star and the circle areas and adhere on place. You could also totally stop here and adhere the pieces together or you can follow the step to create shaker cards.

Here is an image of how I adhered the rows of houses onto the card.

Next apply Clear Double Sided Adhesive onto the background of the die cut piece and then cut a piece of transparent acetate and place it on top of the adhesive.

For the next step, take some 3D foam and apply it aroud the edges of the card as well as around the circle and star image to create a place where to apply the confetti later. Make sure there are no open areas between the foam pieces in the area you are going to place the confetti into later, otherwise the confetti will move to areas you don´t want it to be in.

Now take confetti of your choice and place it onto the inked area of the card base. Then attach the 3D foam treated piece on top and press on place. Add faux stitching around the edges of the cards and if you want to, also around the die cut circle and star area.

Here are the finished cards. I think they turned out really nice.

I hope you have enjoyed today’s Christmas card tutorial. I’ll be stopping by the blog once more in December to share my last guest blog post of the year.

See you then! Happy crafting!
xxx, Sanna

Other:
Confetti
Black stamp ink
Distress Oxides by Ranger Ind. Inc.
Transparent Acetate
3D foam tape
Acrylic block for stamping
Black pen
Die cutting machine

A Way With Words Joset Designs Silk Microfine Glitter

All That Glitters!

September 19, 2019

Hi friends, it’s Sandy Diller back with you today to share a fun and easy way to add some glam to your holiday season!

This project is perfect for gift giving or an easy kids activity. Let’s get started making these festive ornaments.

To make these ornaments I started with the clear glass bulbs that can be found in any of the big box stores. If you don’t find them now, it won’t be long before they show up. They come in many shapes and sizes and I have used a variety here. The tops pull right out for filling with your choice of décor.

As shown below – I have used the Beacon Fast Finish Decoupage to coat the inside of the bulb.

You can use as much as you like to coat the inside because what you don’t use will be returned to the bottle for future use. I like to fill mine about half way – cover the opening with my finger and – then move the liquid around until the inside is completely coated. Try not to shake it because that causes bubbles. Return unused liquid to the jar. If you should get a bubble, turn the ornament upside down and the bubbles will slide out. You may have to give it a little shake or tap.

Once the inside of the bulb is coated with the Decoupage Finish – and while still wet – the Silk Microfine Glitter should be added. Once again, no need to be frugal with the glitter as the unused portion will be returned to the jar for another use. Cover the opening and this time you can feel free to shake it until the entire inside is coated with glitter. Return remaining glitter to the jar. Depending on where you live, you may want to leave the lid off the glitter jar and allow some time for the glitter to dry out. I live in Arizona so it doesn’t take long. If you live in a humid climate you may want to set the open jar aside over night.

Using the Flourished Christmas Minis, cut two designs from silver paper and glue to the outside of the ornament. When the inside is completely dry, replace cap and tie a bow on top.

Tip: First add Double Sided Adhesive to the back of the paper before cutting the design. This way you will have a nice clean sticker to add to the ornament.

The process is exactly the same for all the ornaments, decorate as desired.

For this one, Iced Teal Silk Microfine Glitter and the new Snowflake die from Joset Designs was used.

Here Real Red Silk Microfine Glitter was used and another Snowflake from the same set as above. The Snowflake was cut apart so it would lie flat.

Here is an example of one of the beautiful colors found in the Earth Microfine Glitter Pallette. This one is further decorated with the Berry Branch die and Nuvo Drops for the berries. The branch was cut apart for a perfect fit.

I’m really fond of this one because of it’s unusual shape. After adding the Royal Teal Silk Microfine Glitter it became the perfect night sky. Some adorable little houses were added using the Village Edges die and the star is from the center of the snowflake used on the red ornament. The final touch is a stamped banner.

I have enjoyed sharing these ornaments with you and I do hope you will give it a try. I have linked all the products I used below for your shopping convenience.

Until next time – stay crafty,

S@ndy

https://linkdeli.com/widget.js?1559654439292
%d bloggers like this: