Monthly Archives

February 2015

Elizabeth Craft Designs February Designers Challenge – Combination of Tag & More

February 28, 2015

Hello everyone,

We’re back with our monthly designer’s challenge and for this month we challenged our team to create a project using a combination of the Tags & More dies. If you are new to these fun & versatile dies, then check out this YouTube video by Els van de Burgt demonstrating all of the different Tags & More dies. You will be amazed what you can do with them! We also like to take this opportunity to introduce Marsha Valk to the ECD Design Team. Marsha lives in Amersfoort – a beautiful city in the Netherlands – and has been creative her whole life. Her creative adventure started in 2003 when she discovered scrapbooking and has been an avid scrapbooker, stamper, art journaler and all-around crafter ever since. Marsha loves bright, happy colors which you will find in her craft work as well. For her first project, she created a beautiful tag trio which you can find more information about below.

Trio of Tags by Marsha Valk 

For her first project for the Elizabeth Craft Designs Blog, Marsha created this beautiful Trio of Tags. She die cut the three tag shapes using Tags & More 8 – Lattice out of water color paper and used spray ink to create the colors. For the first tag, she die cut a few other tags and added these to her main tag. She used different dies to decorate her tags like the Small Butterfly, Heart with Wings and Alphabet 1 – Caps. For more info on how to create these colorful tags, visit Marsha’s blog HERE.

Trio of tags

Waterfall Tag Book by Frances Byrne

The next project is from Frances Byrne who created this unique Waterfall Tag Book using the 3 different size tags; Tags & More 8 – Lattice which has a 4 1/4″ width, Tags & More 1 – Lace which has a 3 1/4″ width and Tags & More 6 – Daisy which has a 2 1/4″ width. She decorated her card with the Star Buddies Peel-offs and the It’s a Boy die which comes with the word Girl as well. To find out how to create this fun Waterfall Tag Book, visit Frances’ blog HERE.

Unknown

Unknown-1

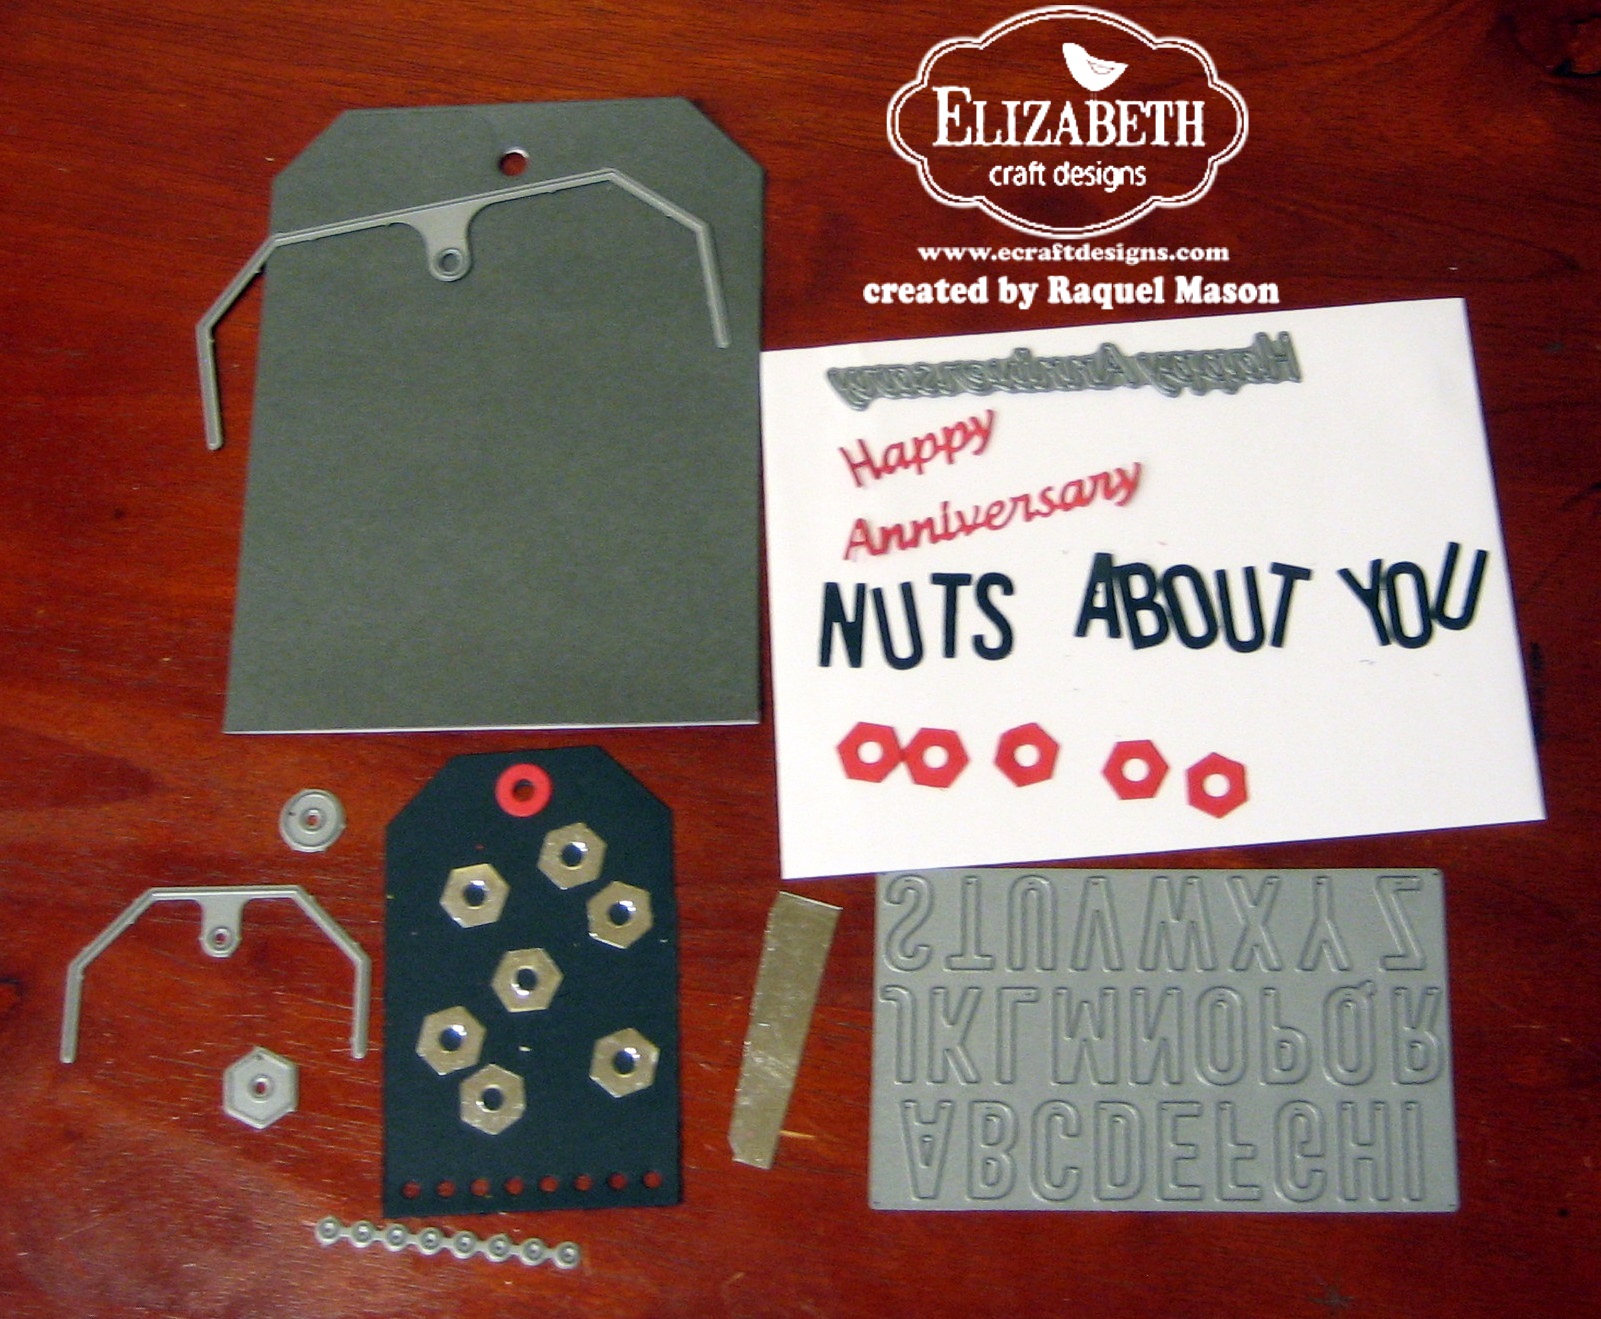
Explosion Box by Raquel Mason

This stunning project is from Raquel Mason who created an explosion box. She used different Tags & More dies to create the little tags inside the box and to create the borders on the tag pockets. To create the bathtub, Raquel used the Karen Burniston Bathtub Pop Stand. She also used the Star Buddies Peel-offs in black to decorate the outside of the box and the Hardware 1 – Hinges. For more info, visit Raquel’s blog HERE.

ECD Explosion Box

ECD Explosion Box 2

Happy Birthday Tag Card by Debra Hensley

Debra Hensley created this sweet Happy Birthday Tag card using Tags & More 7 – Vine for the base of the card and Tags & More 4 – Flourish for the smaller tag. She used the Lots of Dots embossing folder to emboss the card and the Crystal Flower die covered with Silk Microfine Glitter to decorate the smaller tag. If you would like to know how to create this tag card, head over to Debra’s blog HERE for instructions.

ECD Feb DT 4a P1070693

Tag Album by Candy Spiegel 

Candy Spiegel create this beautiful tag album using Tags & More 8 – Lattice to create the 3 tabs of the album. She die cut 4 hinges using Hardware 1 – Hinges that holds the tabs together. On the biggest tag on the right, she created a pocket for two smaller tags which she decorated with the decorative border and corner dies included in Tags & More 7 – Vine. We love the pretty papers Candy picked for her album. For instructions, visit Candy’s blog HERE.

DC_FEBRUARY_Candy_Spiegel

 Beach Theme Mini Album by Joset van de Burgt

Joset van de Burgt also created a tag album but instead of Tags & More 8 – Lattice she used the smaller tag set, Tags & More 2 – Deco to create the 3 album pages. She created a tab on each page to adhere the pages together. To decorate the album, she used Rocky the Crab, Beach Edges, Palm Tree and Pail and Alphabet 1 – Caps. You can create a larger album by simply adding more tags.

Beach tag album

IMG_6516

We hope that you enjoyed these beautiful projects and feel inspired to create your own mini album, waterfall tag book or an explosion box. You can find more information by visiting our designers’ blogs through the links provided.

We’ll be back next month with a Flower Power challenge. Stay tuned!

Nuts About You

February 27, 2015

Hello my crafty friends! It’s Raquel Mason here today. I hear the same complaint from many women that they find masculine cards harder than feminine cards to create. I’ll let you in on a secret: I agree with those women. I am here today to help everyone create a masculine card that is easy and sure to make him chuckle. Let me show you how I made this “Nutty” card.

ECD Nuts About You.

ECD Nuts About You open

1.  Cut gray cardstock 5-1/2″ x 8-1/2″ and score at 4-3/4″ for a standard A2 sized card. Keep the card folded in half and use Tags & More 8 tag-shape die to die cut the card base.

2.  Before doing the next steps, adhere flat sheets of Transparent Double-Sided Adhesive on your cardstock before die cutting but do not remove the backing. Cut black cardstock 2″ x 4″. Cut red cardstock 1-3/4″ x 3-3/4″. Adhere red cardstock on top of black cardstock.

3.  Before doing the next steps, adhere Transparent Double-Sided Adhesive on your cardstock and Shimmer Sheetz before die cutting but do not remove the backing. Die cut the pieces shown in photo below:

  • Cut black cardstock 2-1/4″ x 3-1/2″ then die cut using Tags & More 5 tag-shape die. Die cut little circles at the bottom of the black tag using the die shown below.
  • Using scrap black cardstock, die cut “Nuts about you” using Alphabet 1.
  • Using scrap red cardstock, die cut (1) reinforcement circle, (5) hexagons from Tags & More 5 and Happy Anniversary.
  • Using scrap Silver Metallic Shimmer Sheetz, die cut (7) hexagons and a 1/2″ x 2-1/4″ strip to be adhered behind the small circles on the black tag. Remember to use the Metal Adaptor Plate when die cutting Shimmer Sheetz.


ECD Nuts About You pieces

4.  Adhere “Nuts about you” on the red cardstock from step 2 to the bottom of the card base.

5.  Adhere Silver Metallic hexagons randomly onto the black tag. Adhere the red reinforcement circle on the top of the black tag. Adhere to the card base. Use photo for placement.

6.  Adhere red reinforcement circles to the inside of the card. Adhere “Happy Anniversary” to the right side of the card.

Optional: make a coordinating envelope by adhering red hexagons to the bottom corner.

I hope you have enjoyed this tutorial and feel inspired to try it out yourself. Happy Crafting!

SUPPLIES:

Elizabeth Craft Designs:

961 Tags & More 8 – Lattice

958 Tags & More 5 – Sunburst

967 Alphabet 1

970 Happy Anniversary

SS0211 Silver Metallic Shimmer Sheetz

803 Metal Adaptor Plate

Transparent Double-Sided Adhesive

Other:

Basic Gray, Real Red & Basic Black cardstock – Stampin’ Up!

Wrench Brad – Eyelet Outlet

Lace and Flowers

February 26, 2015

ChristinesPhotoFeb26PostwithWatermark

Hi! It’s Christine here from Susan Tierney-Cockburn’s Design Team. Today, I have chosen Susan’s Garden Dogwood die and a piece of vintage lace to create a card. Dogwood is a sure sign of spring and I love vintage lace. I am always looking for it each time I go to an antique store.

1.  First, use Susan’s Garden – Dogwood die to form the flowers. Use bright green PanPastel for shading and a dark red Copic marker for the center edge of each petal. Glue petals to calyx. Form the brack (stamen) and add it to the flower center. Dab the ends of the stamens leaving little balls on the ends using Viva Paper Pen in green then set aside to dry completely. Cut 2 branches; gluing 1 on top of the other. Petals and leaves were shaped with Susan’s Tool Set and shaded with red PanPastel.

2.  Cut 1 trellis out of wood grain paper using the Bamboo Trellis die. Ink all outside edges in brown ink and attach small black foam squares randomly on the back of the trellis as shown below.

LatticeFeb26PostwithWatermark

3. The fan was made from a vintage piece of lace 5-1/2″ x 2″ which was stiffened with a fabric stiffener and laid flat to dry as shown below.

LacePhotoFeb26PostwithWatermark

4. Once completely dry, pleat the lace and use a clear glue to adhere between each fold on one end and clamp until dry as shown below.

FannedLacePhotoFeb26PostwithWatermark

5.  Using Susan’s Garden stamp Let Us Be Grateful, stamp on a piece of colonial white cardstock using chocolate brown pigment ink and sprinkle immediately with clear embossing powder and heat with a heat gun. Tear around the words and ink the edges of the cardstock using brown ink. Adhere to a piece of dark brown cardstock, tear around the brown cardstock leaving a small border and ink the edges using brown ink.

WorkInProgressFeb26PostwithWatermark

6. The brown card base and pattern paper is actually CTMH cardstock (retired) but here is how to make a card base: use brown 6″ x 12″ cardstock and score at 6″. Then use brown 6″ x 3″ cardstock and score at 1-1/2″ and scallop punch one end of it. See both photos below.

7. Using Transparent Double-Sided Adhesive, adhere the straight edge of the 6″ x 3″ cardstock to the back of the 6″ x 12″ cardstock. See both photos below.

2015-02-25 16 59 34withWatermark    2015-02-25 17 03 17withWatermark

8. Cut dark brown cardstock 5-7/8″ x 5-7/8″, ink the edges in brown ink and adhere to the front of the card.  Cut pattern B&T (background and texture paper) 5-3/4″ x 5-3/4″, ink the edges in brown ink and adhere to dark brown cardstock. Note: putting Transparent Double-Sided Adhesive on your cardstock BEFORE you cut makes it easy to adhere.

Optional: Repeat this step and cover the back of your card as well.

9. Cut dark brown cardstock 5-7/8″ x 1-1/4″, ink the edges in brown ink and adhere to the card flap. Cut B&T paper 5-3/4″ x 1-1/8″, ink the edges in brown ink and adhere to the dark brown cardstock on the flap.

Note: Retired CTMH pattern B&T paper was used as shown but you can substitute any other pattern paper that coordinates with the cardstock you choose.

10.  Adhere the trellis to left edge of the B&T paper on the card front. Adhere the stamped sentiment to the right side of card.

11.  Adhere the branch, flowers and leaves to the trellis.

12.  Adhere the fan to the center of the flap and adhere a small jute bow to the fan.

13.  Adhere (2) 3/8″ magnetic snaps as a closure to the inside of the flap.

I do hope that you have enjoyed my tutorial today and it has inspired you to make your own card using these great products from Elizabeth Craft Designs.

Supplies: 

Elizabeth Craft Designs:

1009 Susan’s Garden Dogwood die

RS005 Susan’s Garden Stamp Let Us Be Grateful

727 Bamboo Trellis die

Transparent Double Sided Adhesive

808 Susan’s Garden Tool Set

Other

CTMH (Close to My Heart):

  • Chocolate cardstock
  • Colonial White cardstock
  • B&T (background & texture paper) Bliss (retired)
  • Chocolate pigment ink for wet embossing
  • clear embossing powder

The Paper Loft wood grain paper

3/8″ magnetic snap

Ranger Distress Ink in Vintage Photo

Viva Paper Pen green

jute twine

vintage lace

PanPastels bright green and red

Copic marker dark red

black foam squares

glue

heat gun

fabric stiffener


Pop it Ups

Pop it Ups Wednesday with Donna – Get Well Soon Rectangle Accordion Card

February 25, 2015

Hello everyone, it’s Donna Wright here today. This is my first ever post on the Elizabeth Craft Designs blog and I’m very happy to be here. I chose to use the Rectangle Accordion die with the Sunflower Peel-off stickers for this post.

get well soon sunflowers ecd wednesday 25 feb

I recently received some fabulous peel offs from Elizabeth craft designs and these sunflowers were among them. I used my alcohol colouring pens with Els’ double sided adhesive and microfine glitter technique to achieve this ultra-shimmery finish peel offs. You can view the video here.

sunflower get well soon ecd wed 25 feb close up

I used the same microfine glitter technique for the individual sunflowers and stems to decorate my card with.

get well soon ecd wed 25 feb flower

Here are the step-by-step instructions:

  1. Cut two pages of different colour blue 6 x 6 cardstock using the Rectangle Accordion die.
  2. Using green cardstock, cut one label from the larger Rectangle Accordion accessories die.
  3. Using white cardstock, cut one label from the smaller Rectangle Accordion accessories die.
  4. Using yellow cardstock, cut one label from the Rectangle Pull Card accessories die.
  5. From blue cardstock, cut out get well soon using Elizabeth Craft Designs word die.
  6. Cut the perimeter of the sunflower peel offs using the Rectangle Pull Card accessories die.
  7. Hand cut around two individual sunflowers and stems.
  8. Use 3D sticky pads on the white and sunflower rectangle label.
  9. Use Elizabeth craft designs double sided adhesive for the yellow and green card stock labels.
  10. Layer the yellow, green and white cardstock labels together.
  11. Use a liquid glue pen to stick the get well soon words to the white cardstock.

Elizabeth Craft Designs Supplies:

I hope you have enjoyed my tutorial and feel inspired to try it out yourself.

Happy Crafting,

Donna

Cherry Blossom Time

February 24, 2015

Cherry-Blossom-Frame-

 Hello! This is Selma Stevenson. This is my first post as a member of the Susan Tierney-Cockburn Design Team. I just returned from a trip to Southern California where all the Cherry Blossom trees were in bloom. This inspired me to create this home decor piece. I have decorated a 10 inch square mirrored frame with a beautiful branch of Susan’s Cherry Blossoms at the top. Along the bottom I have included three white flowers using Susan’s Garden – Anemone dies.

Cherry-Blossom-diesThis is a photo of the Susan’s Garden – Cherry Blossom die.

Instructions:

1.  Use a couple of stencils and texture paste to create a background on the frame. Work on the flowers while this dries. Feel free to leave the frame plain or decorate it with pattern paper.

2.  Die cut the cherry blossoms using a very light pink cardstock. In the above photo of the dies, there are two sets of dies to create flowers. The flower has only two die cut pieces to form the flower (one piece has 3 petals and the other has 2 petals). These flowers are so quick and easy to create. Die cut the 3 piece petal in a darker pink to create the cherry blossom buds. Shape/cup the petals, add glue over most of the topside, then pinch the petals to form a bud.

Cherry-Blossom-Frame-Tutc

3.  Once the flowers are created, work on creating a realistic tree branch as shown below.

 SGDT-Cherry-Blossoms-Tut3

4. For each completed branch, die cut two branches using kraft cardstock. Ink the branches with several colors of Distress Ink then spray them with a light mist of water to spread the ink and loosen the fibers of the cardstock. Shape both branches, using a ball stylus (just press down in the center of all the branches to give them shape). In the photo above, the top branch has been inked but has not been shaped; the bottom branch is well-shaped.

SGDT-Cherry-Blossoms-Tut4

5.  Let the branches dry thoroughly (either air dry or use a heat gun) then glue the two branches together. This creates a sturdy branch which will hold its shape well. Once they are glued together,  ink a darker brown ink over the branch to give more definition to the ridges. It helps make the branch look very realistic.

SGDT-Cherry-Blossoms-Tut6

6.  Once the branches are ready, you can start attaching the cherry blossoms and buds to them. Two branches are pictured above but three were used for the frame.

In the center of the frame is a mirror. It was not possible for me to get a picture without my reflection so I  cut a piece of card stock to cover most of the mirror. The sentiment I used is the Susan’s Garden “Sunshine and Love” sentiment stamp. I will be removing the pink card stock and have the sentiment attached directly to the mirror when I use it for a piece of home decor.

Along the bottom of the frame, adhere several different pieces of lace. The flowers on the white lace were created using Susan’s Garden – Anemone dies. The pretty lavender butterfly was die cut using the Small Butterfly dies.

I love creating home decor pieces with my Susan’s Garden dies. I hope you enjoyed my tutorial and have fun creating your branch of cherry blossoms.

Supplies:

Elizabeth Craft Designs:

1006 Susan’s Garden – Cherry Blossom

1005 Susan’s Garden – Anemone

RS001 Sunshine and Love stamp

713 Small Butterfly

808 Susan’s Tool Set – coming soon!

Other:

Wood frame from IKEA

Ranger Texture Paste

TCW Brick and Birdcage Stencils

KaiserCraft Pearls

Viva Red and Black Paper Pens

Cardstock: light & dark pink, kraft

Distress Inks:  Frayed Burlap, Gathered Twigs and Aged Mahogany

Ivy Hollow ScrapFusion Glue

Lace

Sunflower Blossom Card

February 23, 2015

Hi Everyone!

It’s Debra Hensley today. I’ve been creating realistic flowers using Susan Tierney Cockburn’s dies for years and loving the results. I was so excited when she joined Elizabeth Craft Designs and developed a new set of card-friendly flower dies. I love them all. I am honored to be part of her Design Team and excited to share this card I made using the Garden Notes – Sunflower die and one of Susan’s new sentiment stamps.

SG Feb bp Sunflower 2a P1070639

Once the Sunflower is assembled this card is quick and easy with stunning results!

Here’s how I made it:

1. Fold a piece of 8 1/2″ x 5 1/2″ white cardstock in half to form a standard size A2 card base. Cut black and white dotted pattern paper to 4″ x 5 1/4″ and adhere to card base. Cut a strip of pattern paper 2 1/2″ x 3 3/4″ and adhere to card front about 1″ from the left edge.

2. Die cut using the largest decorator oval from the Accordion Oval Card die. Stamp the Sunshine and Love sentiment stamp in black ink, centered on the oval. Add Black/Silver Glitter Dots around the outer edge of the oval. Adhere to the card front as shown.

3. Create the Sunflower on the left outer edge of the oval. For this card, cut 2 stems, 3 leaves, 2 sets of petals and one base flower. The base layer of the flower is on a pop dot.  Ink the base of each petal with Wild Honey Distress ink for dimension.  You can see a video of detailed assembly instructions by Susan here.

SG Feb bp sunflower closeup 1a  P1070645

4. To complete, add a piece of yellow and white twine tied into a bow around the stem of the Sunflower.

Below is another view of the completed card.

SG Feb bp Sunflower 1a P1070647

Thanks for stopping by today! I hope you give the Garden Notes – Sunflower die a try. The results are beautiful and realistic and are sure to bring a smile to the recipient.

Supplies:

Elizabeth Craft Designs:
772 Oval Accordion Die
999 Garden Notes- Sunflower
RS001 Sunshine and Love Stamp
7018 Glitter Dots Assorted- Black/Silver
808 Susan’s Garden 4 pcs. All Metal Tool Set in Luxury Case ( coming soon)
809 Mini Molding Pad

Other:
Pattern paper: black & white dots, blue & white striped
White cardstock
Ink: Wild Honey Distress & black
Pop dots
Twine


Hello

February 22, 2015

ECDSunflowerGridwm


Hi everyone,

It’s Frances Byrne here today with a card using a couple of the new Susan’s Garden range of dies recently released by Elizabeth Craft Designs. I was super excited when I saw that Susan was releasing the Garden Patch dies as these can be used in so many ways. You can use the grid and the square together or just the grids or the squares on their own.

Here is how I created my card:

1. Cut a piece of cream cardstock 4 1/4″ x 11″ and score at 5 1/2″ to create a top folding card. Sponge around the edges using a light brown ink.

2. Cut a piece of brown cardstock and orange cardstock large enough to fit the large grid from the Garden Patch – 1 1/2 inch & Mini Petals die. Place Transparent Double-Sided Adhesive to the back of each piece of cardstock and die cut.

Cut another piece of brown cardstock 3 3/8″ x 5″. Layer the brown grid onto the brown cardstock. Attach to the folded cream cardstock using foam tape.

3. Using dark brown ink, stamp the Sunshine & Love Rubber Stamp on each of the orange squares. (Note: I used a stamp positioner for mine to help center the sentiment on the square but you could also eyeball it if you prefer. You will need to stamp a second time below the first stamping to fill the square).

  • Sponge the edges of each square using light brown ink. Attach the squares into the brown grid.

4. Die cut 2 each of the Garden Notes – Sunflower using yellow cardstock for the flower; green cardstock for the leaves and brown cardstock for the center (florets/seed pods) of the sunflower.

  • If you are new to assembling the flowers, check out the details on Susan’s video here. Otherwise, feel free to continue below.
  • Use orange chalk to color the center yellow portion of the sunflower and green chalk to color the leaves. Use a balling tool and molding mat to shape the flowers and petals. Glue both large flowers on top of each other offsetting one a little and the smaller single petals around the top center about  1/4″ from the center.
  • Place brown florets/seed pods onto molding mat and use stylus to cup each floret/seed pod and glue these to the center of the sunflower.
  • Use the balling tool to shape the leaves and use the sharp leaf tool to create veins in the leaves.
  • Attach the flower to the card as shown above.

5. Add Transparent Double-Sided Adhesive to the back of the green cardstock. Use the Alphabet 1 – Caps die to die cut the letters HELLO from the green cardstock. Attach letters to form the word HELLO downward on the right side of the card.

ECDSunflowerGrid2wm


The Inside of the Card:

6. Ink the edges of the inside of the card using light brown ink.

7. Cut brown cardstock and orange cardstock large enough to fit the large grid from the Garden Patch – 1 1/2″ & Mini Petals die. Place Transparent Double-Sided Adhesive to the back of each piece of cardstock and die cut. (Tip: You only need to use half of the grid and squares). Trim off any extra lines of text so that the top edge is flush.

  • Adhere the brown grid to the bottom of the card ensuring that it is centered.
  • Stamp the Sunshine and Love sentiment onto the orange squares as completed in step 3.
  • Ink the edges of the orange squares using light brown ink.
  • Adhere the orange squares to the brown grid on the bottom of the card.
  • Trim off any overhang so the edges of the card are even.

8. Stamp Sunshine and Love sentiment to the top section of the inside of the card using black ink.

Thanks for stopping by today. I hope you have enjoyed my tutorial.

Supplies:

Elizabeth Craft Designs:

1001 Garden Patch – 1 1/2 inch & Mini Petals

999 Garden Notes – Sunflower

967 Alphabet 1 – Caps

RS001 Sunshine and Love Rubber Stamp

509 Transparent Double-Sided Adhesive 152 mm

808 Susan’s Tool Set – balling tool, stylus, etc. COMING SOON

809 Mini Molding Pad

Other:

Cardstock: brown, orange, yellow, green, cream

Ink: light brown, dark brown, black

Chalk: orange, green

Foam tape

Glue


Embossed Crystal Flower Cutout Card

February 21, 2015

Hi friends,

it’s Debra Hensley today.  I love flowers of every kind and I especially love sending cards with a flower for the focal point.  Elizabeth Craft Designs has a wonderful variety of flower dies perfect for any occasion. I created an easy and elegant card with a little twist on die cutting that I think you will enjoy.

ECD bp Feb finished 1a P1070682 A

Here’s how I made this card:

1. Cut a piece of white cardstock to 8 1/2″ x 5 1/2″ and fold in half to create a standard A2 size card base. Cut a piece of pattern paper to 5 1/4″ x 4″. Cut a piece of gray white core cardstock to 3 3/4″ x 5″. Cut a strip of pattern paper to 3/4″ x 2 1/2″ and white cardstock to 1″ x 2 3/4″

2. With the Curvy Leaves Embossing Folder, emboss the gray white core cardstock. Sand the surface to bring out the white core and highlight the embossed design.

boss 2 ECD bp Feb EmP1070681

3. Die cut the small Crystal Flower from the embossed piece, centered about 1 ” from the top. The negative space will be the focal point – save the flower to use on another project. Die cut the small Crystal Flower center from pattern paper. Die cut the largest flower from Bunch of Flowers 1.

4. Cut a “v” into the right end of the pattern strip and adhere the Thinking of You Peel-Off.

ECD bp Feb diecuts 1b P1070678

5. Assemble the card: Adhere the pattern paper to the card base. Adhere the embossed piece on foam adhesive to the pattern paper. Add the center to the small flower, curve the petals upward. Add foam adhesive to the center of the small flower and adhere in the middle of the Crystal Flower cutout.

6. Add the black Straight Border Peel-Off strips to the right and left edge of the embossed piece, the right edge of the banner strip, and to the small flower.

7. Adhere the pattern strip to the white strip. Curve with your finger and adhere, on the left side only, of the card front to complete. This design will work perfectly with a variety of sentiments.

ECD bp Feb banner 1a P1070680

Here’s another photo of the completed card below.

ECD bp Feb front 1a P1070685

Thanks for stopping by today. I hope you’ve been inspired to think outside the box with your flower dies and create beautiful cards for any occasion.

Supplies:

Elizabeth Craft Designs:

E105 Curvy  Leaves Embossing Folder
728 Bunch of Flowers 1
924 Crystal Flower Set 1
1004 Straight Borders Peel-offs in Black
343 Assorted Words Peel-offs in Black

Other:

White Core Cardstock- DCWV

White Cardstock

Pattern Paper- Authentique

Foam Adhesive

Sanding block

Inspired by Tile

February 20, 2015

ECD_Tile_Candy_SpiegelHi! It’s Candy! Today I am sharing a card that was inspired by the tile in the bathroom of a banquet facility. Yes – I loved it so much, I took my camera into the bathroom to photograph it. Then I used Shimmer Sheetz and an embossing folder to re-create the look.

049

1. Cut black cardstock 4.25″ x 11″. Score at 5.5″ and fold.

2. Cut paper 4″ x 5.25″ and adhere to card base. Cut black cardstock 2.25″ x 4.25″. (The paper I used is in the supply list but feel free to use a different color). Adhere to card front approximately 5/8″ below the top.

3. Cut five pieces of Shimmer Sheetz 2″ x 1″and emboss as shown below.

ECD_Tile_Candy_Spiegel3

4. Coat with clear, glass-like adhesive. Dry overnight.

ECD_Tile_Candy_Spiegel2

5. Use Transparent Double-Sided Adhesive to adhere to card as shown. Trim off edges.

6. Die cut Daisy, assemble and adhere.

7. Die cut Hello from Shimmer Sheetz using the metal adaptor plate and adhere to the black cardstock. Tip: Apply Double-Sided Adhesive to the back of the Shimmer Sheetz first before die cutting.

ECD_Tile_Candy_Spiegel

Where do you look for inspiration?

SUPPLIES:

Elizabeth Craft Designs:

SS 0106 Purple Iridescent Shimmer Sheetz

E120 Bark Embossing Folder

506 Transparent Double Sided Tape 6mm

901 Daisy

787 Hello

803 Cuttlebug and Big Shot Metal Adaptor Plate

Other:

Cardstock in black, yellow, purple, green

Paper: We R Memory Keepers Indian Summer

Glue Pen

Glastique (Glossy Accents, Diamond Glaze, 3D Crystal Lacquer would work as well)


Pop it Ups

Baby Boy Card – Star Buddies

February 19, 2015

Star Monkey 1

Hello everyone. It’s Joset here today with a cute Baby Boy card. For this card I used the Star Buddies Peel-offs in black, the Accordion Star with the matching Star Fancy Frame Edges, Silk Microfine Glitter, and the It’s a Boy die that also includes the word Girl to use for a baby girl card.

To create the card.

1. Cut one accordion page using the Accordion Star main die from light green cardstock. Cut out the star in the middle and the long side tab so you’ll end up with the just a frame and a star. Ink edges on both.

2. Cut light blue cardstock 5” x 10”. Score and fold in half.

3. Cut 2 star frame edges from the same light blue cardstock and 2 from blue patterned paper. Tip: Apply double sided adhesive to the back of the cardstock and patterned paper first before die cutting.

4. Adhere light green frame to card front, then adhere Star Fancy Frame Edges pieces frame edges as shown in the photo. The four pieces line up and touch, creating the mitered corners. Adhere the star at the top left corner. 

5. Apply a piece of transparent double sided adhesive to white cardstock large enough to fit one Star Buddy Peel-off and 3 small stars. Transfer Peel-offs to the adhesive and sprinkle Cool Diamond Silk Microfine Glitter on top. If you are new to the glittering technique, review and follow the steps in Els’s You Tube video HERE before coloring your Peel-offs.

6. I used Copic markers and a blender pen to color my Peel-offs but you can use any brand of alcohol markers. Cut out Peel-offs.

7. Die cut 2 small light blue stars and 1 light green star using one of the accessory dies included in the Accordion Star die set. Adhere the 3 colored star Peel-offs on top. Adhere 2 stars in the bottom left corner of the frame and 1 in the bottom right. Adhere colored Star Buddy Peel-off on top of your light green star.

8. Die cut It’s a Boy from blue cardstock and adhere to card front as shown. Tip: Add double sided adhesive before die cutting.

I hope you enjoyed this quick and easy Baby Boy card using the fun Star Buddies Peel-offs and will make one for the next baby boy or baby girl in your life!

SUPPLIES:

Elizabeth Craft Designs –
971 Accordion Star
976 Star Fancy Frame Edges
969 It’s a Boy/Girl
2591 Star Buddies Peel-offs in Black
641 Cool Diamond Silk Microfine Glitter
502 Transparant Double Sided Tape Sheet
506 Transparant Double Sided Tape 6mm
802 Fine Pointed Scissors

Other –
Cardstock: White, Blue, Light Blue and Light Green
Patterned Paper: Graphic 45 – Precious Memories Collection
Copic Markers
Blender Pen

%d bloggers like this: