Monthly Archives

May 2014

Uncategorized

Elizabeth Craft Designs May Designer Challenge – Flat A2 size cards

May 31, 2014

Hello everyone,

We’re back to show you some wonderful creations of our Design Team for the monthly Elizabeth Craft Designs Challenge. This month we challenged our designers to create a flat A2 size card.
Of course they had to use some fun ECD products! Let’s see what they came up with.

The first card we like to show you is from Kelly Booth who made this stunning card using the Butterfly Label Peel-Offs in gold, Shimmer Sheetz, Silk Microfine Glitter and some decorative glitter borders. The Shimmer Sheetz background is embossed with our Berry Branch Embossing Folder and looks beautiful. For instructions visit Kelly’s blog.

pYKKwojW5YWcS2DDItLGclyooVDCPvarxddhNl2sANQ

Frances Byrne used the Amethyst Gemstone Shimmer Sheetz to create a gorgeous embossed background for her card. Frances used the Flower in Frame Peel-Off stickers colored on top of the Silk Microfine Glitter Cool Diamond. The Hello is a die cut out of Black Velvet Adhesive. Frances always likes to finish of the inside of her cards so make sure to visit her blog for more pictures!

ECDThinkingofYou-wm_thumb[2]

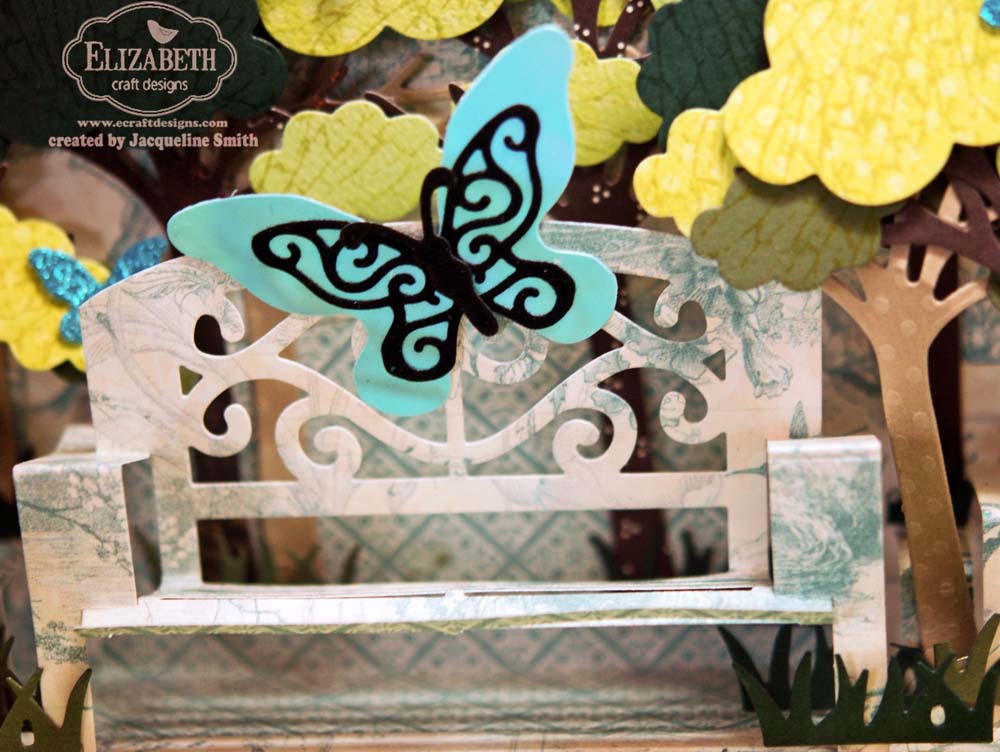
Helen Cryer made this beautiful rose card using the Roses in Oval Peel-Offs in black, the Small Butterfly die and the Karen Burniston Oval Flourish Frame Edges. A great sample to show us that the Frame Edges not only look beautiful on the Accordion Card but also on a flat card.
Very elegant! Make sure to visit Helen’s blog for more info.

DSC_0672

Next card is from Rita Edwards who made this stunning card using different colors of the Silk Microfine Glitter and the Koy Fish and Flowers Peel-Offs in black. I love how Rita created the ocean background using the release sheet of the Double Sided Adhesive. She positioned her
Peel-Offs just perfect. Visit Rita’s blog for more info.

dscf3123_2

Raquel Mason chose one of the Jackie’s Dolls in Circle Peel-Offs to create her flat A2 size card.
The colors of the Peel-Off look beautiful and they match perfect with the rest of the card. Raquel added the Circle Frame Edges and some glitter borders around the Peel-Off. The blue cardstock is embossed with our Swirly Curves Embossing Folder. Visit Raquel’s blog for instructions.

ECD Flat A2 May Challenge

Karen Aicken made three beautiful Christmas cards all featuring the Snowflake die and Peel-Offs. She started with a very simple clean card (top left) and added more details to the other two. I love the layers of snowflakes on the last card (front) and the embossed Shimmer Sheetz background. Karen explains each of them on her blog so make sure to check it out.

Card_ECD_MayDesignChlng_13

Debra Hensley hasn’t been feeling very well this past week but still managed to create this stunning glittery positive/negative card. Debra used the Flower Label 1 Peel-Offs, the Basic Black and the Antique Silver Silk Microfine Glitter. A really fun technique you definitely want to try yourself!
For instructions visit Debra’s blog.

ECD designer challenge May1 P1060634

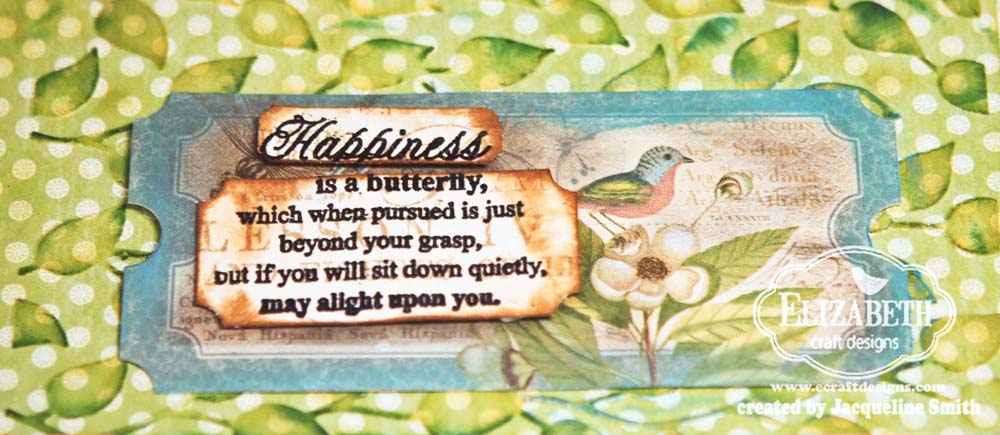
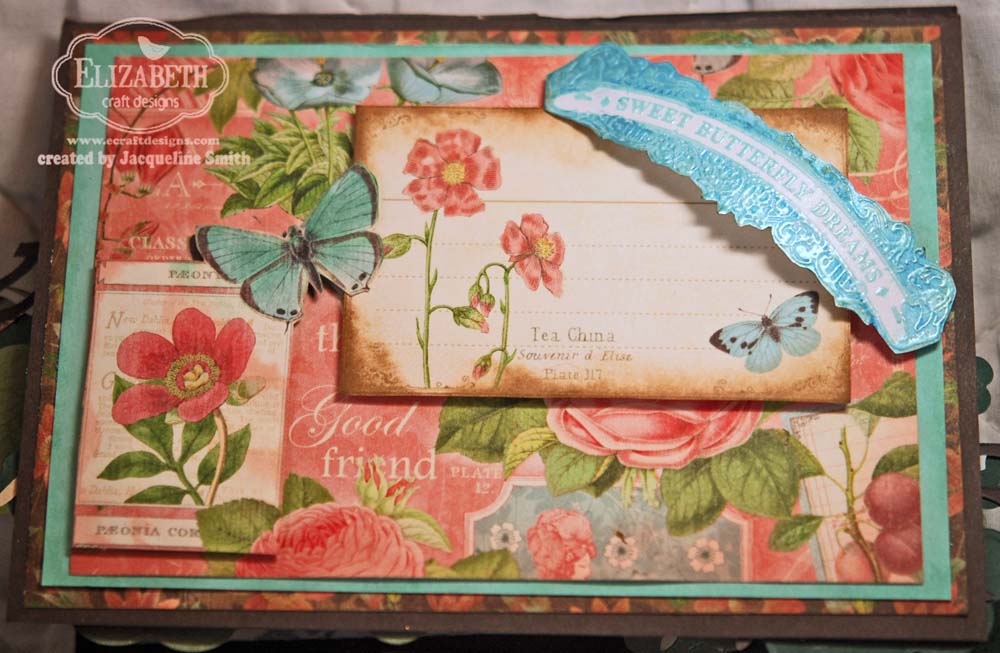
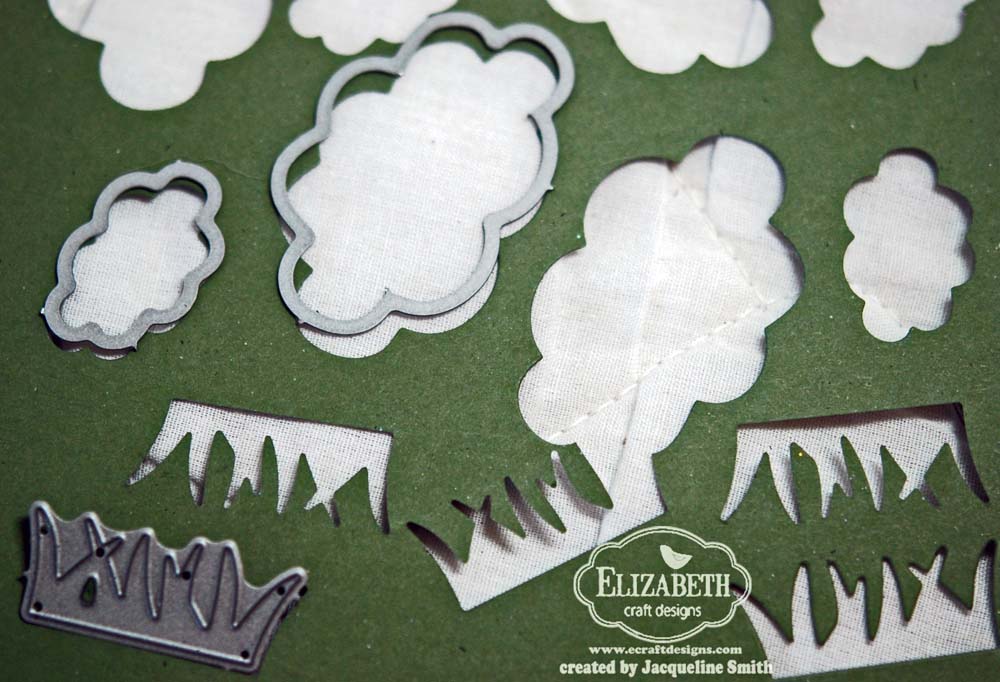
Jackie Smith made a beautiful card using the Coffee and Tea Peel-Offs in Silver. Jackie created the base of her card first and then colored the Peel-Offs. Or was it the other way around? It sure does match perfect! I love the use of the Tag die and the Damask Embossing Folder for the sentiment. For more info and supply list, visit Jackie’s blog.

DSC_0020-1

Candy Spiegel loves to make flat cards so for her this was an “easy” challenge. Candy made a gorgeous card using the Flower Cuties 2 Peel-Offs in gold. I love the colors Candy picked to color the Peel-Offs. More info and wonderful projects on Candy’s blog.

ecd_may_candy_spiegel

Last card we like to share today is from Mary Prasad. Mary used the other Cutie from the Flower Cuties 2 Peel-Off sheet and the Ruby Gemstone Shimmer Sheetz for decoration. I love the little added pearls on the flower “bells”. A very colorful card! For more info visit Mary’s blog.

SONY DSC

We are at the end of today’s challenge. Thank you to all the designers for their wonderful projects!
I hope you enjoyed each and every one of them. Make sure to try some of the cards yourself so head over to the designers blogs for instructions. Next challenge will be posted on June 30.

Have a wonderful day!

Pop it Ups

Shimmering Daisies

May 30, 2014

Daisies Card Front Side View

Created by Mary Dimercurio Prasad for the Elizabeth Craft Designs DT.

I love the look of shimmery paint! I decided to try painting on black paper with Perfect Pearls.
The silver Daisies in Oval Peel-Off is the perfect subject for this technique!

Making the Card

1. Cut card base from black cardstock, 4 1/4 inches by 11 inches and fold in half.

2. Remove the Daisies in Oval Peel-Off from the backing sheet and stick to black paper.

3. Use the main die from the Accordion Oval Card to line up and cut around the Peel-Off.
Cut the tabs off so you just have a shadowed oval Peel-Off sticker.

4. With a small paintbrush and water, apply the Perfect Pearls to the daisy Peel-Off as shown.
You only need a very small amount of Perfect Pearls.

5. Cut a piece of Silver Metallic Shimmer Sheetz to 3 3/4 inches by 5 inches. Emboss with Swirly Curves. Apply black acrylic paint with a paper towel. Rub off excess. Some should stick in the grooves giving an antiqued/distressed look.

6. Cut a length of white ribbon to go around the bottom of the embossed piece of Shimmer Sheetz as shown; adhere it down, wrapping it around the sides. Adhere this to the black cardstock base.

7. Using the Accordion Oval Card accessory dies, cut the scalloped oval from black cardstock and the smaller stitched oval from the Silver Metallic Shimmer Sheetz. Make sure to use the Metal Adaptor Plate when die cutting Shimmer Sheetz. Adhere the silver stitched oval to the center of the black scalloped oval.

8. Die cut 3 copies of Hello from the black cardstock and adhere them on top of one another. Adhere this to the center of the silver stitched oval. Assemble the rest of the card as shown.

Shimmering Daisies Card Front

It’s easier to see the shimmer in the above photo. Have a sunny day!

Supplies

Elizabeth Craft Designs

Other Supplies

  • Black Cardstock
  • Perfect Pearls, various colors
  • Black Acrylic Paint
  • White Ribbon
  • Small Paintbrush, Water


Dragonfly Dancer Easel Card

May 29, 2014

Ecd dragonfly fairy stand up 1a P1060620

Hello Again!

It’s Debra. Here in Texas the flowers are blooming, the heat is rising and the dragonflies are starting to emerge in their beautiful iridescent colors. I saw one a few days ago shimmering in green hues dancing along the edge of the pool. It inspired me to color the dancer image from Dragonfly Ladies 1 Peel-Off and make a birthday card for someone special. I knew she would need to stand up to dance and an easel card would be perfect. The leaf image from the Stand Up Helpers die made my easel so easy! Let me show you how I did it.

Directions:

1. Fold a 11 x 4 1/4 piece of purple cardstock in half at 5 1/2 making an A2 size card base. Score the top half in the middle at 2 3/4 to form the fold for the easel.  With a pencil, make a mark at 2 3/4 on the bottom half  for placement of the Leaf from the Stand Up Helpers die. This will become the stopper for the easel so it will stand up. Add a 3 1/4 x 4 piece of dark purple cardstock on the inside bottom half of the base. Die cut to leaves along the center through both layers. Erase the pencil lines.

Ecd dragonfly fairy SUH 1a 20140523_152101

2. To form the front of the easel, layer a 3 1/3 x 5 1/2 piece of green dotted pattern paper,
a 3 x 5 1/4 dark purple piece and a 2 3/4 x 5 piece of the base purple cardstock. Adhere the bottom half only to the front of the card base below the scored line.

3. Die cut a wreath from the Wreath Bow die in pink cardstock. Clip it apart as shown below.

ECD dragonfly fairy wreath 1a 20140523_154531

4. Adhere double sided adhesive to a piece of 3 1/4 x 5 3/4 piece of white cardstock. Peel off the liner and flip it upside down next to your adhesive covered piece. Place the Dragonfly dancer and accessories sticky side up on the release sheet.

ECD dragonfly fairy outline 1a 20140523_112502

5. Place the adhesive covered piece over the Peel-offs on the release sheet and press firmly to make sure the stickers attach well to the adhesive. Peel off the liner. The Peel-Offs should now be transferred. Cover the entire surface with Cool Diamond Silk Microfine glitter. Brush off the excess and polish with your finger to set the glitter and bring up the shine.

ECD dragonfly fairy glitter 1a 20140523_112816          ECD dragonfly fairy glittered 1a 20140523_113148

6. Color with Copic Markers or other alcohol markers. Remember that the glitter is now a non porous surface for the ink to adhere to. It’s best to have a light touch as it doesn’t take much ink to cover the surface. If you want to intensify the colors, let them dry before adding another layer.

Ecd dragonfly fairy colored 1a 20140523_120046

8. Trim out each image closely. To hide the white cut edges and make the pieces look more finished, color the edges with a black marker. Color with the back side facing you so if your marker slips it will not mark up the glittered side. Adhere the top of the tutu accessory piece to the image on the top edge only, then use a piece of foam adhesive so it will lift and add dimension. Here is a closeup:

Ecd dragonfly fairy pop 1a 20140523_122531

9. Ink the edges of the cut wreath with purple ink. Add on both sides of the dotted panel. Add flowers. The ones used on this card were left over from the White on White card I made using Bunch of Flowers 1 cut from vellum. I added a green glitter dot to each flower center on top of the brad holding them together. Add the dragonfly dancer on foam adhesive to the front. Add the accessory wings behind the popped up image. Add the small circles and dots from the Peel-Off for a fun backgroud. Refer to the image below of the closed card for placement.

Ecd dragonfly fairy closed 1a P1060632

10. Cut a 3 1/4 x 2 1/4 piece of pink cardstock and adhere it to the bottom inside of the card base below the Stand Up Helper leaves. Die cut Happy Birthday in purple and adhere to pink piece.
Add colored bird and flowers. Add green glitter dots to the corners. To complete pop up the leaves so your easel card will stand. Here is a side view:

ECD dragonfly fairy side 1a 20140524_152315

The Stand Up Helpers die really make the hardest part of an easel card simple. There are several cute designs to go with any theme. If you haven’t given an easel card a try yet I hope this tutorial will inspire you and guide you along the way.

Elizabeth Craft Designs products used:

792 Stand Up Helpers
731 Wreath Bow
728 Bunch of Flowers 1
738 Happy Birthday Large
2555 Dragonfly Ladies 1
7018 Glitter Dots Green/Gold
641 Cool Diamond Silk Microfine Glitter
501 Double Sided Adhesive

Other Products used:

Cardstock- Bazzill
Printed Paper-Jillibean Soup
Dusty Concord Distress Ink
Copic Markers- E02, V20, V22, V28, YG07, R81, R83, R85
Foam Adhesive
Black Sharpie Marker

Stenciled Flowers Birthday Card

May 28, 2014

Card Front White

Designed by Mary Dimercurio Prasad for the Elizabeth Craft Designs DT.

Making the Card

1. Cut card base from white cardstock, 4 1/4 inches by 11 inches and fold in half.

2. Mask beyond the fold (back of card) with Post-It Tape or other masking material.

3. Create flower masks: cut various masks using the flower dies listed in the Supplies list from Post-It Tape or other masking material. Keep both the positive masks (the flowers) and the negative masks (the outlines of the flowers).

4. Starting from the left and moving right across the card as shown: mask an area with a negative mask, use the blending tool and ink to fill in the mask working from the outside to the inside of the flower. Remove mask to reveal flower. To create the 2nd layer, use another negative mask, offset it from the first, choose a coordinating color and ink it. Hint: use paper or more masking material to cover the rest of the card to prevent mishaps.

5. Put the matching positive masks over the already inked layers and repeat the process until the flowers go all the way across the card.

6. Adhere enamel dots to the flower centers.

7. Cut Happy Birthday sentiment out of red cardstock. Cut a banner out of pink vellum. Adhere enamel dots and sentiment to banner as shown. Adhere to card using dimensional tape hidden behind dots and letters.

Card Front Black

Supplies

Elizabeth Craft Designs

Other Supplies

  • White Cardstock, Red Cardstock
  • Post-It Tape or other masking material
  • Pink Vellum
  • Distress Ink, various bright colors
  • Ink Blending Tool and Foam
  • Enamel Dots
  • Dimensional Tape
Pop it Ups

Hello Mr. Cat!

May 26, 2014

Hello there, friends!

This is Rita Edwards here today and would like to share my brand new card: Hello Mr. Cat!

It’s been a fantastic week here since my best friend Monika came to visit and of course, between some morning coffee, visit to Carmel and afternoon wine tasting, crafting was part of our fun together. She asked me to make a cat card so we picked the peel-off together, the paper, the die sets and then she sat and admired everything I was doing — so very sweet! So let’s see what we created together.

1. Cut a 6″ high by 12″ wide piece of craft paper for base. Also, cut a 5″ high by 12″ wide blue card stock paper and adhere it to the base.

2. Score at half of the width, at 6″ mark and fold.

DSCF2965_2

3. Place the House Pivot Card die over the score mark and make the die cut. This is the first time I’m using the die set myself!

4. Cut 2 pieces of 2″ high by 6″ wide green cardstock if you have a 6″ x 6″ pad (like me) or one 2″ high by 12″ wide and score at 6″.

DSCF2966_2

5. Use your grass shaped Stand Up Helper die to die cut the top of the green cardstock.

DSCF2967_2

6. Use a craft blade to cut the connection points between each grass bunch and adhere the green cardstock to the lower portion of our card base. Set base aside.

DSCF2968_2

7. Die cut the little flowers from the All Seasons Tree die set.

DSCF2970_2

8. Take out your Cats in Frame Peel-Off stickers, Transparent Double Sided Adhesive Sheet and white cardstock.

9. Peel off the release sheet from the Double Sided Adhesive Sheet and adhere the adhesive side to the white cardstock. Peel off the other release sheet and set it to the side.

10. Place one of the cats, a bowl and a mouse from the Cats in Frame Peel-Off stickers facing down (sticky side up) onto the release sheet and place the Double Sided Adhesive Sheet on top.

11. Add Warm Diamond Silk Microfine Glitter over the Double Sided Adhesive Sheet, brush off the extra glitter and rub the surface with your finger.

12. Use your Copic or other alcohol markers to color the surface.

13. Fussy cut around each object and complete the die cuts with the House Pivot Card and All Seasons Tree die sets.

DSCF2971_2

14. Assemble the card with all the elements.

As always, I had a fun time creating this card and just so happy that Monika took my card to our mutual friend in Texas, made with love in California.

Thank you again for stopping by today and I hope you all have a wonderful Memorial Day weekend!

hugs, Rita

Supplies by Karen Burniston for Elizabeth Craft Designs:
– (902) House Pivot Card die set
– (781) All Seasons Tree die set

Supplies by Elizabeth Craft Designs:
– (792) Stand Up Helpers die set
– (SKU 0360) Cats in Frame Peel-Off Sticker
– (501) 5″ x 12″ Double Sided Adhesive Sheets
– (639) Warm Diamond Silk Microfine Glitter

Other Supplies:
– DCWV The Glitzy Pastels cardstock
– Momenta cardstock

DSCF2977_2 DSCF2981_2 DSCF2980_2


Pop it Ups

Sweet Butterfly Dreams

May 25, 2014

Hi Everyone,

It’s Jackie once again and I’m showing you what I like to do on a hot day like the one we had this past Friday here in Edmonton. I’m using the following Karen Burniston’s dies – “Garden Bench”,
“All Seasons Tree”, “Butterfly Pivot Card” and “Butterfly Accessory Dies”. On hot days, I would love to sit on a park bench under the trees  and watch people go by.

DSC_0001-1

Instructions: Front 
1. Create base from brown cardstock. Cut 7″x 10″ rectangle; score and fold in half (front fold card is 5″x 7″).
2. Cut brown/peach flower paper 4 3/4″x 6 3/4″, layer on top using Double-sided Adhesive to base. Cut blue paper 4 1/2″ x 6 1/2″, again layer it on the brown/peach paper using Double-sided Adhesive. Cut blue/peach paper 4″x 6″ and layer it on top.
3. Cut out blue butterfly and pink flower from same paper, adhere using pop up dots as shown.
4. Stamp sentiment using Pool pigment ink and emboss using Pool Party embossing powder.
Heat set.
DSC_0011-1
Instructions – Inside

1. Create insert using blue (Birds of a Feather) paper. Cut 6 3/4″ x 11″; score and fold in half. Place Garden Bench on fold line and run it thru die machine. Reverse paper and cut background paper behind the bench. I then cut out a couple more pop up steps to add more trees as shown by Karen Burniston  in this video using the Lots of Pops die.  Cut out light green dot paper 3″x 6 1/2″ and run it thru Curvy Leaves Embossing Folder. Sponge dark green ink to highlight embossed areas.DSC_0001-1

2. Cut out trees using various brown papers using the All Seasons Tree as shown. Cut out foliage using various green papers using the small & large clouds from the All Seasons Tree. Adhere using glue dots and pop up dots as shown. Cut out grass using various green papers using the grass die from the Garden Bench die.DSC_0016-1

3. Apply Double-sided Adhesive to white paper. Cut out butterflies using small butterfly from Butterfly Pivot Card. Remove liner and adhere Blue Sky Silk Microfine Glitter. Adhere using glue dots as shown.DSC_0017-1

4. Cut butterfly using Blue Iridescent Shimmer Sheetz using the die from Butterfly Accessory Dies. Cut the overlay using Black Velvet paper and using the filigree butterfly and body.DSC_0010-1

5. Stamp sentiment onto a brown script paper using Pool pigment ink and emboss using Black Embossing Powder. Heat set. Cut out using Photo Label large Punch. Sponge brown ink along edges.  Adhere on large sticker by Graphic 45 Botanical Tea collection.DSC_0008-1


SUPPLIES:

Elizabeth Craft Designs
780 – Garden Bench
781 – All Seasons Trees
778 – Lots of Pops
773 – Butterfly Accessory Die
767 – Butterfly Pivot Card
E105 – Curvy Leaves Embossing Folder
SS 0103 – Blue Iridescent Shimmer Sheetz
406 – Velvet Adhesive Sheet Black
502 – Double-sided Adhesive Sheets

Other
Cardstock – Early Espresso, Pool Party paper and Shimmery White – Stampin’ Up,  Graphic 45 Botanical Tea Collection
Other: Paper Trimmer, scoring board, Black, Pool Party Embossing Powder, Glue dots – Stampin’Up, Pool Pigment ink – Clearsnap
Tattered Rose, Pine Needles and Brushed Corduroy- Tim Holtz Distress Ink


Pop it Ups

Lucy Label Pop Up Gifts Card

May 24, 2014

Hello to all our worldwide crafting friends!! (I really love how crafting and blogging makes me feel like I have a huge bunch of lovely like-minded friends ‘out there’!) It’s Helen here today, sharing a Pop Up ‘n’ Peel-Offs card.

SONY DSC

Directions:

1. Cut a piece of bright pink cardstock to approx. 10.5” x 4.5”. Put a crease across the middle.

2. Cut a piece of pale pink cardstock to approx. 4 3/8” x 6”. Put a crease across the middle.

3. Die cut the pale pink cardstock with the Lucy Label Pop Up die, and emboss it with the Lots of Dots Embossing Folder.

4. Adhere the pale pink cardstock piece inside the bright pink cardstock piece, as pictured above.

5. Adhere two thin strips of pale pink cardstock (4.5” x 0.25”) near the top and bottom borders of the card, and adhere two 4.5” lengths of black ric-rac, overlapping the pale pink strips slightly.

6. Adhere a 4.5” length of bright pink pom pom trim, just below the ric-rac nearest the top of the card.

7. Die cut ‘Happy Birthday’ from black cardstock, and adhere to the pom pom trim.

8. Add a strip of Ribbon Flowers Peel-Off Stickers, just above the pale pink cardstock, as pictured below. Add adhesive gems to the centres of the flowers.

SONY DSC

9. Cut a white cardstock label from the Lucy Label decorator dies, and adhere to the Lucy Label
Pop Up.

10. Use three of the Gifts Peel-Off Stickers, and glitter them, colour them, and cut them out, as shown by Els in this tutorial. Attach them as shown above to the pop-up parts of the card.

11. Add the negative parts of the three Gifts Peel-Off Stickers, using Transfer Sheets, with the method shown in this tutorial.

Elizabeth Craft Designs products:

(717) Happy Birthday
(1262) Ribbon Flowers Peel-Off Stickers
(2544) Gifts Peel-Off Stickers
(779) Lucy Label Pop Up
(641) Cool Diamond Silk Microfine Glitter
(501) Double-sided Adhesive
(E114) Lots of Dots Embossing Folder
(802) Fine pointed Scissors
(600) Transfer Sheet

Other Products:

Bright Pink cardstock
Pale Pink cardstock
Black cardstock
White cardstock
Black ric-rac
Bright Pink pom pom trim
Copic pens
Small Adhesive Gems
Adhesive foam pads / Tape runner / White craft glue
Trimmer


Balloon Happy Birthday

May 23, 2014

ECDBalloon-wm

Hi everyone,

It’s Frances here and today I would like to share a birthday card I created using Elizabeth Craft Designs Peel-Off Stickers, Shimmer Sheetz and one of the new embossing folders. I always love to finish off the inside of my cards so I will also show you how I have done that.

To create the card:ECDBalloon3a-wm

1. Cut a piece of Double Sided Adhesive sheet approx 4 inches x 4.5 inches. Remove the release sheet from one side of the adhesive and set aside upside down on your desk (shiny side up). Adhere your Double Sided Adhesive sheet to a piece of white card the same size.

2. From the Balloons Peel-Off Sticker sheet remove the bunch of 3 balloons and the long dotted balloon. Place these sticky side up onto the release sheet that we set aside earlier.

3. Take your white card and place it with the adhesive side facing down onto the release sheet with the Peel-Offs on it. The Peel-Offs will lift from the release sheet and stick to the adhesive on the card stock.

4. Turn your card so that the release sheet is now on top. Take off the release sheet and make sure not to touch the adhesive. You have now transferred your outline sticker.

5. Cover the adhesive with Cool Diamond Silk Microfine Glitter and polish with your finger. You can see a video Els created using this technique here. Color your images as desired. Cut out the 2 balloon images.

6. Layer the bunch of balloons using foam tape onto a piece of white card that is 2 inches x 4 inches. Attach Line Peel-Offs around the edge of the white card. Layer this to a piece of black card that is 2 1/4 inches x 4 1/4 inches. (Keep the remaining balloon for the inside of card)

ECDBalloon8a-wm7. Cut a piece of white card 4 inches x 5 inches and a piece of Double Sided Adhesive the same size. Remove the release sheet from the Double Sided Adhesive and layer this onto the white card.

8. Cut Yellow, Green, Orange and Blue Iridescent Shimmer Sheetz so they are 4 inches x 1 1/4 inches and attach these to the adhesive paper prepared in step 7.

9. Place your Shimmer Sheetz panel in the Lots of Dots Embossing Folder and run it through your die cutting machine. Remove Shimmer Sheetz and use a sanding block to remove the color from the raised areas.

10.Trim down the Shimmer Sheetz so it measures 3 3/4 inches wide (keep offcut, this will be used on the inside of the card).

11. Add Line Peel-off Stickers between each color of Shimmer Sheetz and also around the edge of the Shimmer Sheetz panel.

12. Layer Shimmer Sheetz panel onto a black card that measures 4 inches x 5 1/4 inches.

13. Cut a piece of orange card 4 1/4 inches x 11 inches, score in the center so you have a 4 1/4 inch x 5 1/2 inch top folded card. Assemble layers as shown in the photo of the finished card at the beginning.

ECDBalloon2-wmFor the inside of the card:

14. Cut a piece of white card that is 3 3/4 inches x 5 inches and layer onto a black card that is 4 inches x 5 1/4 inches.

15. Add the strip of Shimmer Sheetz that you trimmed down in step 10 to the left edge of the white card. Add a Line Peel-Off Sticker along the edge of the Shimmer Sheetz.

16. Cut a piece of white card and Double Sided Adhesive Paper that are 3 1/2 inches x 2 inches. Remove the release sheet from the Double Sided Adhesive and layer this onto the white card.

17. Use this paper and die cut the words “Happy Birthday” ensuring that the adhesive paper will be at the top of the letters when die cutting. Remove the release sheet from the “Happy Birthday” and cover adhesive with Soft Green Silk Microfine Glitter and polish this with your finger. Adhere the greeting to the white card.

18. Adhere remaining balloon that we created earlier to the top right hand side of the card. From the Balloon Peel-Off Sticker sheet remove a balloon string and curly string and place them with your balloon on the card. Adhere inside panel to the inside of your card.

Thanks for stopping by today!

SUPPLIES:

Elizabeth Craft Designs
Balloons Peel-Off Stickers (2552)
Lines Peel-Off Stickers (1016)
Cool Diamond Silk Microfine Glitter (641)
Soft Green Silk Microfine Glitter (631)
Happy Birthday Die (738)
Lots of Dots Embossing Folder (E114)
Yellow Iridescent Shimmer Sheetz (SS 0108)
Orange Iridescent Shimmer Sheetz (SS 0109)
Green Iridescent Shimmer Sheetz (SS 0107)
Blue Iridescent Shimmer Sheetz (SS 0103)
Double Sided Adhesive (502)

Other
White Card
Black Card
Orange Card
Sanding Block
Foam Tape
Copics

Lacy Butterflies

May 22, 2014

Hi – it’s Karen Aicken here, and today I wanted to share a CAS (Clean And Simple) card. I absolutely love the butterfly dies at Elizabeth Craft Designs, and that they come in separate pieces:
a silhouette, an overlay and a body/antenna piece. They are so versatile and you can create many different looks with them.

Card_ECD_LacyBflies_01

1.  Cut a piece of patterned paper, 8-1/2 x 5-1/2″. Score it in the center (at 4-1/4″) to form a side fold standard A2 card.

2.  Cut a white card stock panel 3-3/4″ x 5″ and adhere it to the center of the card front.

3.  Cut a 2nd white card stock panel 3-1/2″ x 4-3/4″ and ink the edges with a sponge and dye ink. Adhere this to the card front, centering it on the white panel below it.

Card_ECD_LacyBflies_02

4.  Die cut five small butterfly overlay pieces and five bodies. Note, I cut them from the same watercolor-effect patterned paper I used for the card base, but I wasn’t happy with the colours when I laid them on the card. They were too muted for my taste, so I sponged each of the five overlay pieces with coordinating dye ink colours. I did not ink the butterfly bodies.

5.  Die cut the ‘Hello’ from the same patterned paper and attach it as shown using a glue pen.

6.  Attach a butterfly body to each butterfly, and attach a small strip of foam tape to the back of each butterfly.

7.  Now comes the fun part! Lay out four of the butterflies onto your card front, and when you are happy with the arrangement peel off the backing from the foam tape and adhere them in place.

8.  Gently fold the wings up, which creates shadows and gives the card even more interest.

Card_ECD_LacyBflies_03

9.  Cut a patterned paper panel 4 x 5-1/4″ and attach this inside your card.

10.  Cut a white card stock panel 3-1/2″ x 4-3/4″, ink the edges with a sponge and dye ink. Then attach it inside the card centered on the patterned paper panel.

11.  Attach the remaining butterfly inside the card as desired, gently lifting the wings.

Just think how quickly you could make a set of these cards to give as a gift! While I kept my card CAS … one of my favourite ways to use the Elizabeth Craft Designs Shimmer Sheetz is to cut butterfly and dragonfly overlay pieces and doing that would certainly take this card to a new level. As would adding Silk Microfine colored glitter to the butterfly bodies or cutting them out of Velvet Adhesive Sheets. What about using an embossed Shimmer Sheetz in place of the top card stock layer? There are lots of variations to this simple layout.

Card_ECD_LacyBflies_04

I hope you enjoyed my card, made quickly and easily using Elizabeth Craft Designs dies!

Elizabeth Craft Designs Products:

713 Small Butterfly die
787 Hello die

Other Products:

Big Shot
Patterned paper
White card stock
Dye inks and sponges
Glue Pen
Adhesive
Foam tape

Thanks for stopping by today.

Pop it Ups Videos

Karen Burniston Pop it Ups Designer Challenge – FLY!

May 21, 2014

Hi, it’s Karen Burniston with the May Pop it Ups Designer Challenge. Each month I challenge my Designer Challenge team to use Pop it Ups dies for a specific theme. This month the challenge was to interpret the word “Fly” any way they choose using Pop it Ups dies.

For my project I’m using the Butterfly Pivot Card, Butterfly Accessory Die and Butterfly Embossing Folder (all of these products coordinate perfectly with each other) to teach a fun technique I’m calling a Triple Pivot Card.

Here are photos of the finished card from the video:

01_Butterfly_Triple_Closed 02_Butterfly_Triple_Closeup 03_Butterfly_Triple_Open 04_Butterfly_Triple_TopView 05_Butterfly_Triple_Folds 06_Butterfly_Triple_Glitter

Interested in using some of the other Pivot Card dies for a Triple Pivot Card? Here are some examples using the Heart Pivot Card, Katie Label Pivot Card and House Pivot Card.

07_Triple Pivot Cards

Elizabeth Craft Designs Supplies:

Other Supplies: Cardstock: Bazzill, Patterned Papers: Glitz, Glossy Accents: Ranger, Clear stamp greeting: Lawn Fawn, Washi Tape: source unknown

Now let’s see what the amazing Designer Challenge Team plus three Guest Designers came up with for the theme.

DC Team

Let’s start with the designers who chose to use Pivot Card dies.

Raquel Mason created an amazing Z-fold card with the Butterfly Pivot inside the card. Shimmer Sheetz on the butterflies give everything a bit of sparkle.

Raquel_Butterfly

Summer Hills-Painter also used the Butterfly Pivot Card die and combined it with the Agatha Edges for a gorgeous look. The butterflies look so elegant cut all in white.

Summer_Butterfly

Summer Hills-Painter also made this fun card with the Katie Label Pivot Card. What a perfect interpretation of the theme!

Summer_Katie

Karen Aicken made two great House Pivot Cards for the challenge. On this first one the house is styled as a bird house and all the elements for the card came from a piece of patterned paper. Smart!

KarenA_House2

In Karen Aicken‘s second card, she’s used adorable stamps and the perfect sentiment. Notice the fun way she created a fence for the left half of the card by using the extra picket die that comes in the set.

KarenA_House

I had a great time teaching earlier this month at the Great Yosemite Stamp Escape and it was especially fun to meet Jenn Dove. We really hit it off and I am in absolute awe of Jenn’s artistry and coloring skills. She agreed to join this month’s challenge as a guest designer and check out what she whipped up with the Katie Label Pivot Card. (Her blog has full instructions, so make sure you click her name to head over there)

JennD_Katie

We were also lucky enough to join our new Texas friends Joy and Deb for a quick trip into Yosemite after the retreat. Here’s a photo of Jenn and me in front of a little baby tree.

yosemite tree

Helen Cryer has such a way with combining elements. This gorgeous Butterfly Pivot card is no exception. She’s added in the Butterfly Accessory dies and the Agatha Edges for an explosion of color and flight. Beautiful!

Helen_Butterfly

Remember how I said that the designers could interpret the word “Fly” any way they wanted? Leave it to Frances Byrne to have the perfect stamps to make a housefly bug card! This card features the Katie Label Pivot card.

Frances_Katie

Frances Byrne also made a second challenge card, this time with the House Pivot Card and some cute stamped kids floating in the sky with balloons. Frances bent the fence back in line with the card and extended it. This is a great alternate use for the fence side of the pivot card.

Frances_House

Fran Sabad created a stunning acetate Butterfly Pivot card with pretty floral elements. Click her name to head to her blog and see all the photos and angles of this breathtaking card.

Fran_Butterfly

This next batch of cards uses the general pop-up dies:

Caz Counsell sent hedgehogs into the sky for this fun Garden Bench card, complete with soft fluffy clouds and a fabulous mosaic-look grass. You can’t help but smile at a cute card like this!

Caz_Bench

Raquel Mason always comes up with clever ways to use the dies differently and this month her imagination flew (see what I did there?) to converting the Lucy Label die into a standing pop-up. She has full instructions and a short video on her blog.

Raquel_Lucy

By now I am thoroughly convinced that there’s nothing Kelly Booth can’t color to perfection! Check out her adorable Lucy Label pop-up card with adorable stamped and colored critters. That background is marvelous!

Kelly_Lucy

Fran Sabad pieced together a hot air balloon for a Lucy Label pop-up with bright colors and loads of fun. All of the elements work beautifully together . . . bravo!

Fran_Lucy

Donna Wright also used the Lucy Label this month to make a tall skinny card (8″ tall by 3″ wide) to create a soaring kite scene. Pop it Ups dies can be used in any size card anywhere along the fold and Donna illustrates that perfectly with this pretty card.

Donna_Lucy2

Donna Wright also made another Fly card with the Lucy Label, this time mixing in the butterfly dies and embossing folder plus edging the card with the Agatha Edges. Such a pretty card!

Donna_Lucy

My good friend and fellow crafter Jennifer Mock has recently started working with me one day a week making class kits. Having Jenn to help has been a life saver! I asked her to be a guest designer for the Fly challenge and she created this cozy little Coffee card to illustrate the expression “Wouldn’t you love to be a fly on the wall?” (Notice the fly on the wall!) The friends, deep in gossip, are also “flying” on a clear Lucy Label platform. Check out that wood floor! Love this.

JennM_Lucy


For the final batch of cards, let’s look at what the designers did with the Accordion Album dies:

Caz Counsell made this bright and fun Oval Accordion card with some super cute flying bug stamps. The dotted border on the ovals adds a nice touch and the brightly colored bugs mirror the colors in the paper.

Caz_Oval


Gretchen Schmidt made this absolutely perfect illustration of the Fly theme using stamps on the Circle Accordion Album. She also used the companion Square w/Circle Frame Edges to add a mitered patterned paper frame to each page. I love her use of the little hearts for Houston and her family in Kansas.

Gretchen_Circle

When Helen Cryer creates it’s always incredible (or, as I like to say; Helencredible!) and this project definitely fits that bill. I love how she’s decorated the Oval Accordion album with the clouds from the All Seasons Tree and everything is done on a warm kraft color. The layering of the stamps gives them such dimension.

Helen_Oval

Sandy Diller has joined the challenges as a Guest Designer in the past and was available to add a Fly card this month. And what a fly card! She chose a “Time Flies” theme and created this stunning Circle Accordion project. The detailing and elements in this card really give it a vintage masculine feel.

Sandy_Circle

And finally, check out this stunner from Shelly Hickox (a true Shellypiece!) using the Fancy Accordion Album and Fancy Frame Edges dies. Such a fabulous masculine card featuring Shelly’s signature faux finish techniques. She also has a Vine video on her blog post showing this card in action. You’ll definitely want to check it out!

Shelly_Fancy


Thank you to the amazing team and our three guest designers for posting incredible creations this month. Join us on June 18, 2014, for the next Karen Burniston Pop it Ups Designer Challenge. The June theme is to use the Accordion Albums to show off photos and I’m sure we’re in for a treat with the talent assembled here!

Stay in the loop on all the other amazing cards being posted daily using Pop it Ups dies by Liking my Facebook Page, signing up for my mailing list on my Blog, and following my Pinterest Boards.

KB Blog Sig


%d bloggers like this: